DIY Picture Framing Tips: The Proper Way to Back a Wood Frame
When you opt for DIY custom framing, you have the freedom and control to make your own decisions about frames and other elements all along the way. And that freedom should be accompanied by an assembly process that exemplifies simplicity and helps protect your piece.
At American Frame, we’re always here to help guide your efforts and make the custom framing experience a simplified one. In this article, we’re focusing on the proper way to back a wood frame, including tips on how to tackle this DIY framing project for a beautiful, professional-looking presentation that protects the art.
A dust cover is a methodically cut sheet of Kraft paper or acid-free backing paper used to cover the back of a custom wood frame, preventing bugs, dust and other debris from getting anywhere near your work. It also helps to stabilize the level of humidity inside your wood frame, which can be negatively impacted by moisture. Applied correctly, a dust cover effectively seals the backside of a wood frame, protecting the work from damaging particles and adding a professional flair to the finished treatment.
Follow along as our framing specialists illustrate these easy, step-by-step directions for backing a wood frame with a protective paper that not only looks professional, but also safeguards your artwork or photography.
Step 1: Apply adhesive transfer tape.
Adhesive transfer tape is a double-sided, professional-quality framing tape used in mounting artwork to a backing board, adhering mat boards to backing board, attaching double mats to each other or adhering dust covers to the back of wood frames. It is recommended as a basic element of a DIY framing supply kit.
As the first step in backing your wood frame, you’ll want to apply a strip of ATG tape to the back lip of the wood moulding, all the way around the perimeter. For ease and efficiency of application, consider using an adhesive tape applicator.

Applying tape to the back of a frame using an adhesive tape applicator
Step 2: Apply and trim the backing paper.
Choose a Kraft paper or acid-free backing paper, and use a piece that is slightly larger than the frame you’re backing. Once the adhesive transfer tape has been fully applied, flip the frame over onto the oversized backing paper and press down firmly to be sure the paper sticks. Then flip the frame back over.

Use a piece of backing paper slightly larger than the frame
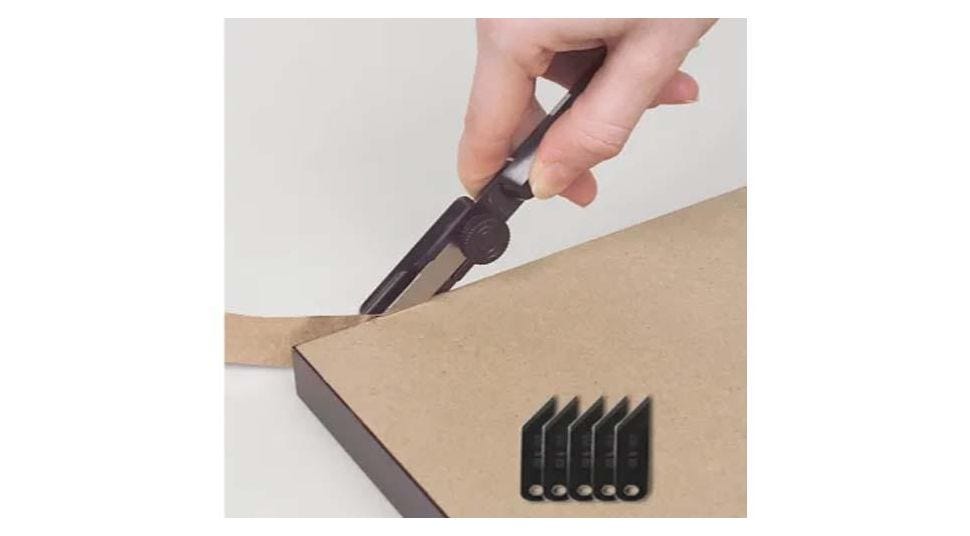
Using a dust cover trimmer or a utility blade, cut off the excess Kraft paper. If using a blade, be sure to cut the paper slightly on the inside of the edge of the frame so that it won’t be seen when viewing from the side or front. The dust cover trimmer does this automatically, which is especially helpful for giving your DIY framing project the most professional look possible.

The dust cover trimmer easily trims the backing paper right to the edge
When complete, it should look similar to this.

Fully trimmed kraft paper on the back of the frame
Step 3: Apply the hanger or mounting system.
Next, apply a sawtooth hanger for mounting your frame. Start by finding and marking the center of the top back portion of the frame. Then align the hanger with the center mark, and hammer the hanger into the wood frame. Note: For a larger or heavier piece, be sure to opt for wire or the Hangman Wood Picture Frame Hanging System, which includes extra-strong wall mounting hardware and a built-in level for wood frames. The system is 18 inches long and holds up to 200 pounds when two screws are fastened into wood studs.

Align the sawtooth hanger in the middle of your wood frame and hammer it in
Step 4: Give it the final touch.
The final step in a proper backing process for a wood frame is adding two bumper pads to the bottom two corners of the frame. These plastic pads serve double duty by protecting the wall from being scratched by the bottom of the frame, as well as preventing the frame from shifting or tilting once hung.

Use bumper pads in the bottom corners of your frame to protect your wall
This final touch completes the backing for your DIY custom wood framing project. By following these simple steps, you’ll help prevent damaging particles from entering your frame and prepare your finished piece to be beautifully displayed.
As always, feel free to get in touch with our experts for any assistance you may need with your next custom framing project, including free samples, instructional information and more.